

How To Create Bootable Usb Windows Server 2019
Scenario
![]()
Tin can I copy Windows Server 2019 to USB?
Hi, recently I bought a new PC, it is completely blank. I want to copy Windows Server 2019 to my USB, so as to use Windows Server on my PC? Does anyone know how to perform that? Thanks a lot."
- Question from Microsoft.com
Why copy Windows Server 2019 ISO to USB?
Nowadays, lots of people want to burn Server 2019 ISO to USB drive to make a bootable drive. Generally, there are two purposes of doing such performance:
● Create a installation media. Simply like the scenario, you have a new PC without organisation or demand to upgrade organization to Server 2019 on different PCs, you tin can salvage server 2019 to a USB to create a installation drive.
● Make a portable Server OS drive. It allows yous to rapidly enter Windows Server 2019 environment on unlike computers without installation.
Next, this article will demonstrate you lot how to copy Windows Server 2019 ISO to USB based on the 2 purposes.
Content:
-
Re-create/burn Windows Server 2019 ISO to USB for installing Os
-
Copy Windows Server 2019 ISO for a portable Server system
-
Kicking from the Windows Server 2019 USB
Copy/fire Windows Server 2019 ISO to USB for installing OS
If you lot want to create a Windows Server 2019 installation media, yous can refer to this part.
- ★Preparations:
- Download the Windows Server 2019 ISO files from Microsoft.
- A USB flash drive over 8 GB. Windows Server 2019 consumes at least 4 GB, but while being burned to USB, the ISO epitome will be automatically split into more than than 3 GB chunks. And so it needs extra space.
- Back up your USB bulldoze if there are some important files on it considering your USB drive will be formatted.
To copy Windows Server 2019 ISO to USB for installing OS, you demand to brand thumb drive bootable with Diskpart first of all. Insert your pollex drive to computer and follow the steps below:
Step 1. Click "outset", input "cmd" in the search box and correct-click on the search upshot, then click"Run as administrator" to open up the Command Prompt window tool.
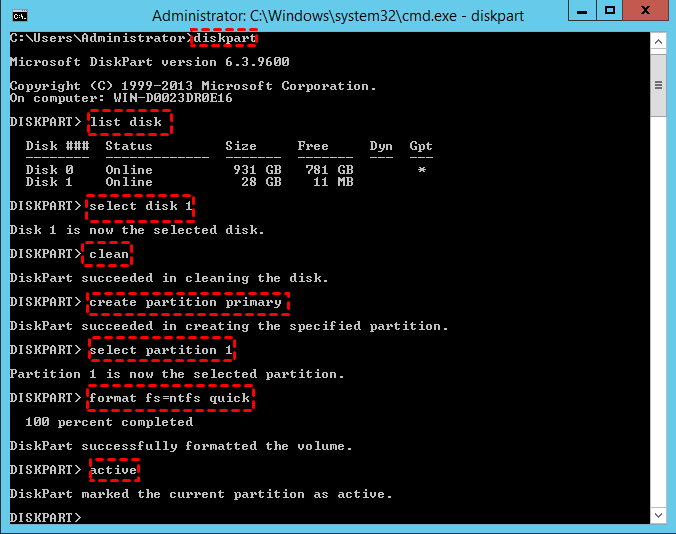
Stride two. Type "diskpart" and press Enter to open up the Diskpart tool. Type all the following commands and printing Enter to execute them i by 1.
● listing disk
● select disk x (x is the number of your USB flash bulldoze)
● clean
● create partition chief
● select partition 1
● format fs=ntfs quick (if you want to create UEFI bootable USB, type "format fs=fat32 quick").
● active
Step 3. Type "exit" and press Enter to close diskpart command window.
At present your USB drive is bootable, practise not shut the Command Prompt. Mount the Windows Server 2019 ISO and follow the side by side steps to copy/burn Windows Server 2019 files to USB.
Step 4. Type "xcopy D:\*.* Due east: /s/e/f"(D is the ISO prototype drive, and bulldoze Due east: is the USB drive alphabetic character) in the Command Prompt and printing Enter.
Step 5. Type "D:\Boot\Bootsect /NT60 E: /force /mbr" to write a bootloader to your USB drive.
- Notation:✎...
- Dring Xcopy command process, you may recieve a bulletin that "file creation mistake - the parameter is incorrect" or "the install.wim is besides big", it is because limit of FAT32 file organisation, y'all can split up the file or convert the FAT32 to NTFS file organisation.
Now you can install Windows Server 2019 on your PC. And aforementioned steps can too help you lot to install other Windows Server systems, similar copying Windows Server 2016, 2012, 2008 ISO to USB.
Copy Windows Server 2019 ISO for a portable server USB
The in a higher place steps are virtually how to copy Windows Server 2019 to USB for installing OS. If yous want to boot and run Windows Server 2019 from USB or other external drives, you tin can install Windows Server to USB with AOMEI Sectionalisation Assistant Server. Information technology provides a characteristic named "Windows To Get Creator" that enables you to create Windows Server 2019 bootable USB from ISO files or electric current arrangement and so that you tin boot a full Windows operating organisation from a USB drive at anytime and anywhere. And it owns lots of highlights over other similar tools:
● It can save Windows 11/10/8.1/8/7/XP or Server OS on uncertified USB wink drives. As is well-known, Microsoft has built-in Windows To Go tool, merely it is only available to Windows x/eight.1/8 Enterprise Edition and certain certified USB brands.
● It keeps your USB and computers carve up. You tin can securely use familiar environment from different computers. When you pull out the USB, the computer can run the original organization.
● It just needs at to the lowest degree 13 GB chapters. Compared to Microsoft built-in Windows To Get and some other software Windows To Go feature, it saves lots of infinite of USB.
Y'all can click the following button to download the Demo edition of AOMEI Partition Assistant Server to take a try. And follow the steps to create a bootable USB.
By the way, if you are interested in Windows 11, yous can also create a Windows 11 bootable USB.
Footstep 1. Connect a USB drive to your Windows Server computer. Install and open AOMEI Partitioning Assistant Server. Click "All Tools" on the left window and select "Windows To Go Creator".

Pace 2. Here, choose "Create Windows To Go with system disc/ISO" and click "Next".

✍Note: If you don't take the Windows Server ISO file, y'all can cull "Create Windows To Go with the electric current system".
Pace 3. In this window, select a USB bulldoze, if it doesn't show, click "Refresh".

Footstep four. And so click "Browse" to select Windows Server 2019 ISO.

Stride 5. Then you volition be prompted that the process volition wipe data on the selected USB drive, then back up files you need in advance. Ensure you accept backed upwardly important files and click "Yes". And click "Go along".

That is how to install Windows Server 2019 ISO to USB to make a portable Server USB bulldoze. This is can be also applied to install Windows Server 2008(r2), 2012, 2016,and other Windows systems to pen drive.
Boot from the Windows Server 2019 USB
Afterwards burning or installing Windows 2019 ISO to USB, you lot tin insert it to your computer to install or run a OS. And you might demand to enter BIOS to kicking the PC from the Windows Server 2019 USB. And follow the steps below:
Step 1. Insert the Server USB, and plough on the PC. When the logo appears on the screen, immediately tap the BIOS primal.
Step ii. In the BIOS setup, use arrow keys to choose "Boot" tab, and select "Modify boot gild".

Step iii. Motion the Server 2019 USB to the tiptop in the listed bulldoze, salvage it and leave BIOS. Then your computer volition be started from the USB.
Conclude
I hope this article can assistance you re-create Windows Server 2019 ISO to USB, whether you want to do it for installation or a portable Server arrangement. In addition to that, AOMEI Partition Assistant Server likewise provides other features that may help you, for case, if y'all find your computer tin can't kick, you can create a bootable USB for repairing with it.
And there is AOMEI Partition Assistant Unlimited Edition and Technician edition for visitor and arrangement. It covers all the features of the Server Version and provides unlimited usage within ane company and so that you can save much money. What's more, Unlimited and Technician Editon offers a corking feature, "Create Portable Version". It can create AOMEI Partition Assistant to a removable device, like USB wink drive. Then you tin can insert the device into other computers and run AOMEI Sectionalisation Assistant without installation. It is convenient for engineers to do IT maintenance or back up on customer computers.
Source: https://www.diskpart.com/server-2019/windows-server-2019-iso-to-usb-1984.html
Posted by: perkinssweves.blogspot.com
0 Response to "How To Create Bootable Usb Windows Server 2019"
Post a Comment